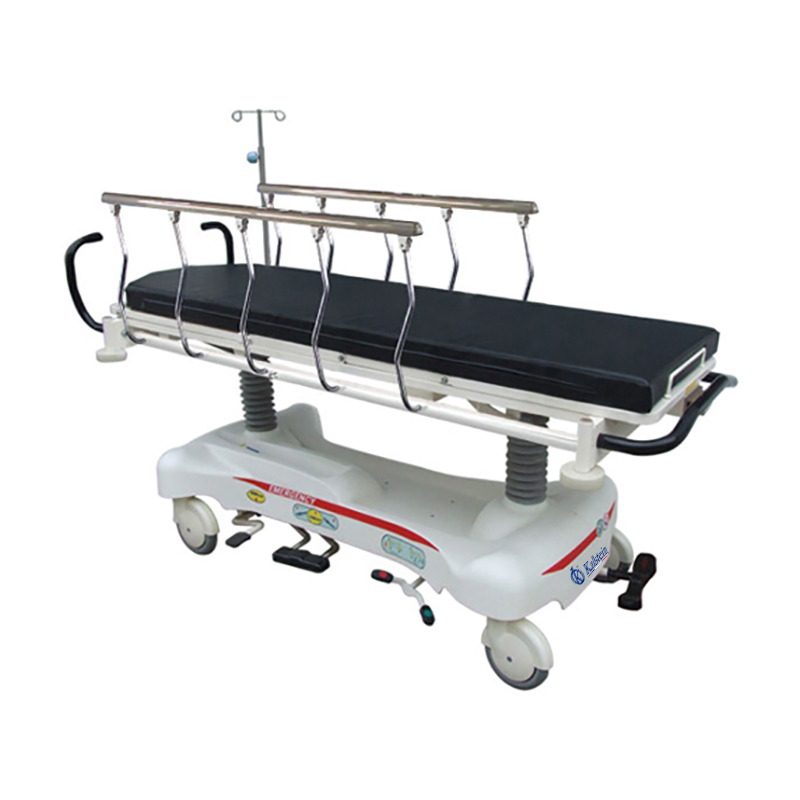
Installation and Commissioning Guide for the YR06289 Hydraulic Five Function Transfer Stretcher
The YR06289 Hydraulic Five Function Transfer Stretcher is a versatile piece of medical equipment designed for safe and efficient patient transfer. This guide aims to provide detailed steps for the installation and commissioning of this stretcher, ensuring that it functions optimally in clinical settings.
Unboxing and Initial Inspection
Before beginning the installation process, it is essential to conduct a thorough inspection upon unboxing. Verify that all components are present and inspect for any visible damage. The standard components of the YR06289 include:
- Main stretcher frame
- IV pole
- Gas spring mechanisms for adjustable backrest
- Central brake system
- Guide wheel for ease of movement
- Oxygen reservoir
Ensure that the manual is included for reference during installation.
Setup Requirements
Before installation, ensure that the installation site meets the following requirements:
- Flat surface for stability
- Access to power supply (if required for electric functions)
- Compliance with local health and safety regulations
- Adequate space for operational maneuvering
Installation Steps
Follow the steps outlined below to successfully install the YR06289:
- Positioning: Place the stretcher in its designated area, ensuring it is on a flat surface.
- Assembly: If not pre-assembled, attach the IV pole and ensure that all nuts and bolts are tightened securely.
- Brake System Activation: Engage the central brake system to secure the stretcher in position.
- Height Adjustment: Adjust the height according to the needs of the user or clinical setting, ensuring the range of 630-930 mm is utilized.
- Backrest Calibration: Test the gas spring mechanism by adjusting the backrest to confirm proper function.
- Oxygen Reservoir Check: Ensure the oxygen reservoir is properly installed and functional.
Power-Up Sequence
If the stretcher includes powered functions, follow these steps to initiate power:
- Connect the stretcher to the power supply.
- Turn on the main power switch, typically located near the base.
- Check all electric functions (if applicable) to verify they are operational.
First-Run Calibration
Once the stretcher has been powered up, perform the following calibrations:
- Test the height adjustment mechanism to ensure it operates smoothly between the specified range.
- Move the stretcher through its full range of motion to ensure functionality.
- Check the responsiveness of the central brake system and guide wheel.
Common Setup Mistakes and Troubleshooting
During the installation and commissioning process, several common mistakes can occur. Here is a list of potential issues and their solutions:
| Issue | Potential Cause | Solution |
|---|---|---|
| Stretcher does not power on | Power supply issue | Check connections and ensure power source is functioning. |
| Backrest does not adjust | Gas spring failure | Inspect gas spring for damage, replace if necessary. |
| Wheels do not lock | Brake malfunction | Inspect brake components and tighten all connections. |
Technical Data for the YR06289
| Specification | Details |
|---|---|
| Model | YR06289 |
| Size (L*W*H) | 2120*800*610/930mm |
| Frame Materials | PP |
| Side Rail Materials | Stainless steel and aluminum alloy |
| Bed Base Materials | PP |
| Pump | American Powerpacker hydraulic |
| Backrest Max Upward Angle | 75° |
| Height Adjustment | 630-930 mm |
| Trendelenburg Angle | 15° |
| Anti-Trendelenburg Angle | 15° |
| Legrest Max Upward Angle | 0-45° |
Frequently Asked Questions
What are the key features of the YR06289 Hydraulic Stretcher?
The YR06289 features a central brake system, adjustable backrest using a gas spring, a guide wheel for easy maneuverability, and an IV pole. It is also designed to accommodate X-ray imaging.
How do I ensure the stretcher is correctly leveled during installation?
To ensure correct leveling, use a spirit level during the installation process. Adjust the feet of the stretcher as needed until the bubble is centered between the markers.
What should I do if the oxygen reservoir does not seem to function?
If the oxygen reservoir is unresponsive, check the connections for leaks or blockages. Ensure the reservoir is securely attached and that the oxygen supply is active.
How can I troubleshoot the gas spring for the backrest?
To troubleshoot the gas spring, first inspect for any visible signs of damage. Test the backrest adjustment; if it does not function properly, the gas spring may need replacing.
What maintenance does the YR06289 require post-installation?
Regular maintenance includes cleaning all surfaces, checking for loose bolts, inspecting the brake system for wear, and confirming that all moving parts are functioning smoothly.
Can the YR06289 be used in a surgical environment?
Yes, the YR06289 is designed for clinical use, including surgical environments, due to its compatibility with X-ray imaging and its robust construction.
How do I request a quote for the YR06289?
You can request a quote for the YR06289 by contacting our sales team through the provided channels for detailed pricing information.
If you are looking for a fusion of innovation and quality, you have come to the right place. At Kalstein, we offer you the luxury of exploring our exclusive catalog of laboratory equipment. We manufacture every device to the highest standards of excellence. Our intuitive and seamless online purchasing channels are designed for your convenience, securing the most competitive prices. Hesitate no longer — we bring science to life, it is time to become part of our community.